Integration Steps
Follow these steps to connect your law firm's Filevine account to LawLink.ai. This procedure is for law firms connecting their own Filevine account (not for vendors).
⚠️ Important: These steps must be completed in order. If you skip the activation step or copy the wrong key, the integration will fail.
Activate LawLink.AI in Filevine
Log in to your Filevine Dashboard. Click the hamburger menu (☰) at the top left and choose Advanced, then select Integrations. In the right-hand pane, scroll down to LawLink.AI and click Activate.
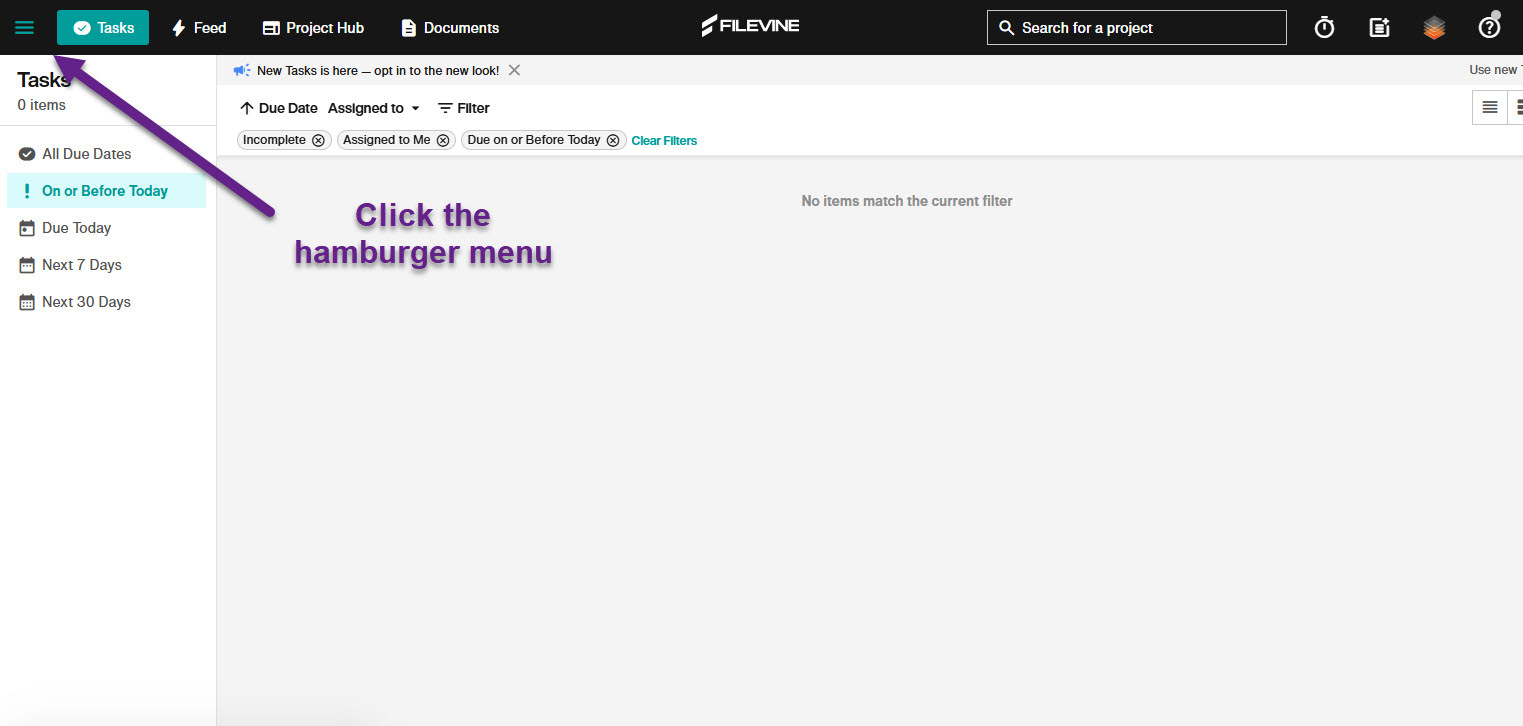
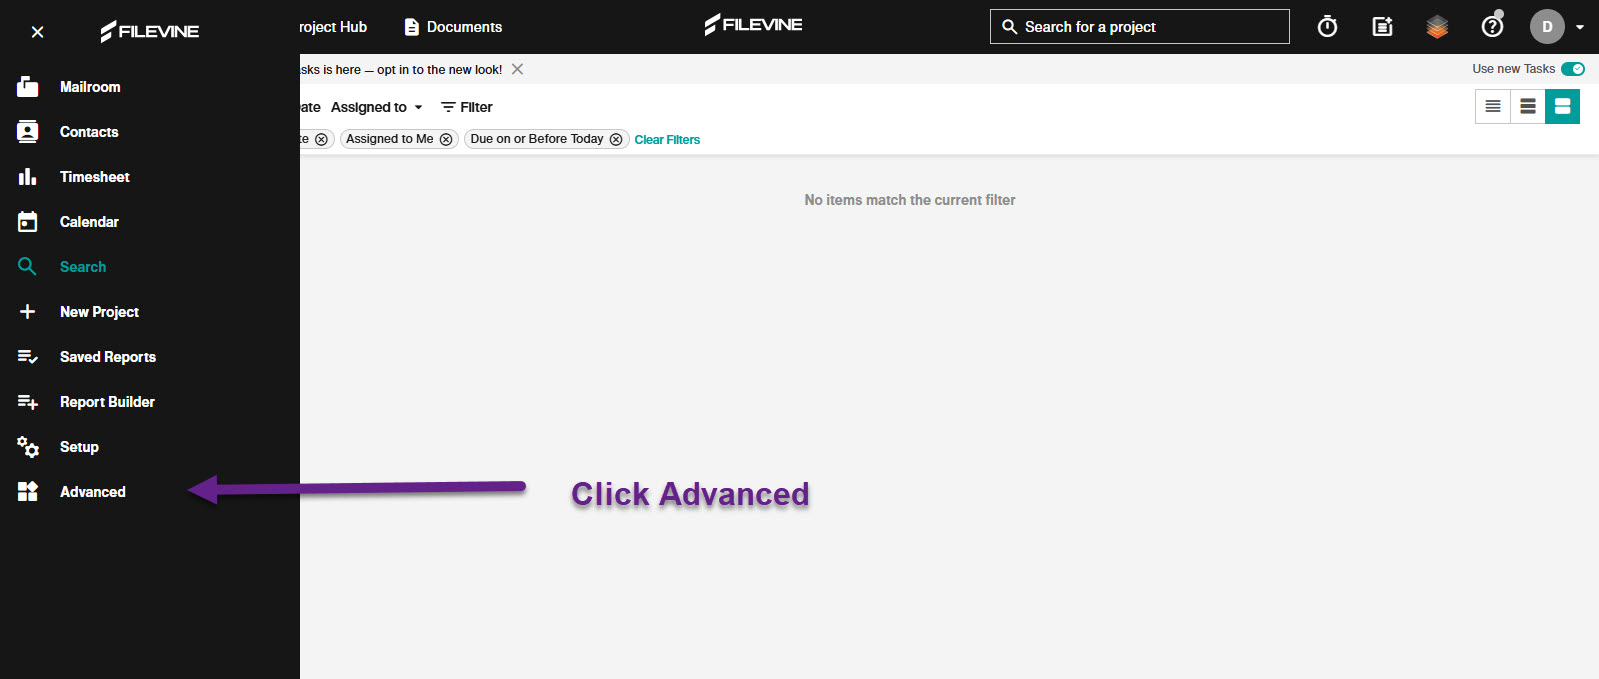
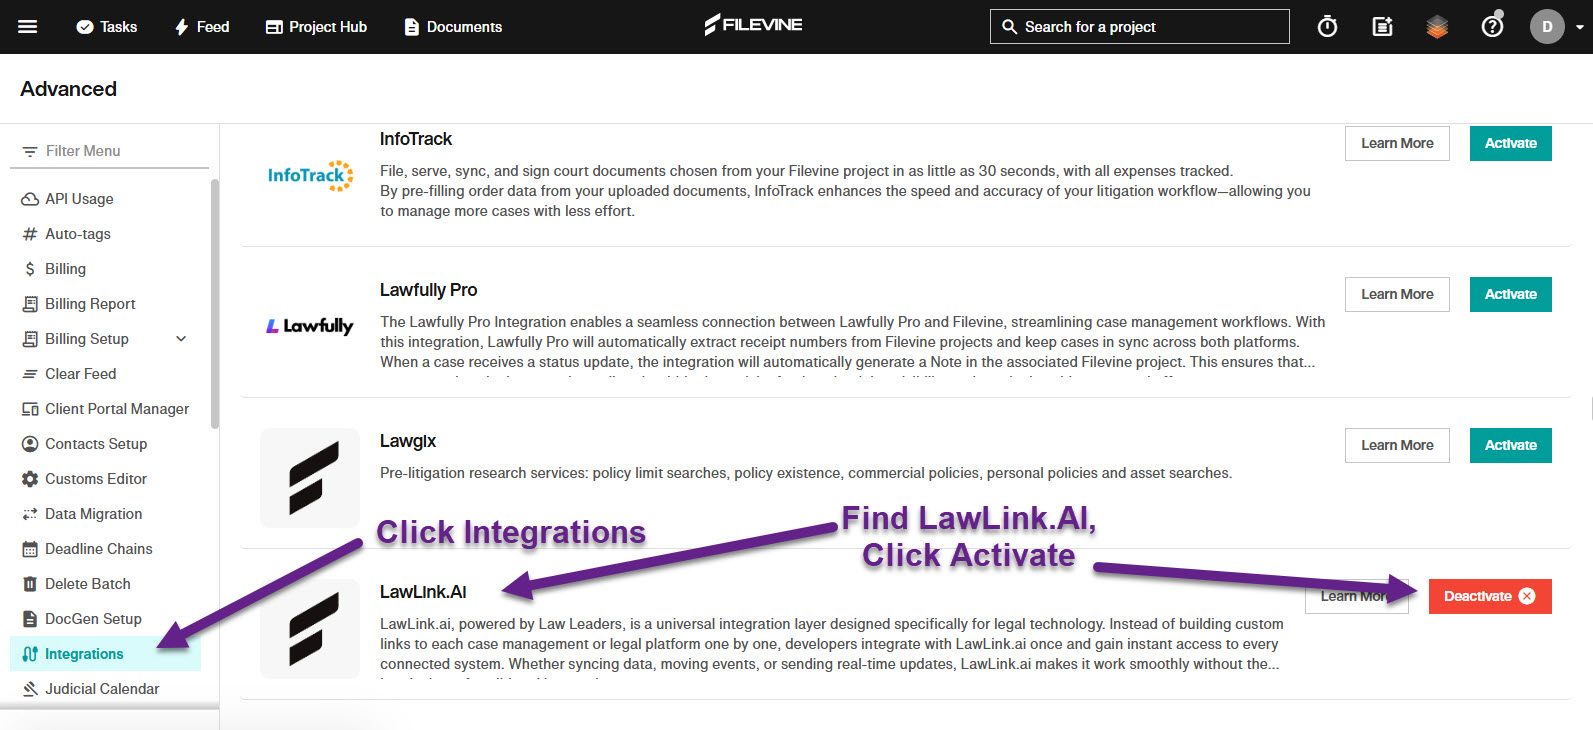
✅ Confirm: LawLink.AI is now activated when its button changes to Deactivate. Make sure you see the Deactivate button before you continue.
Open Access Tokens in Manage My Account
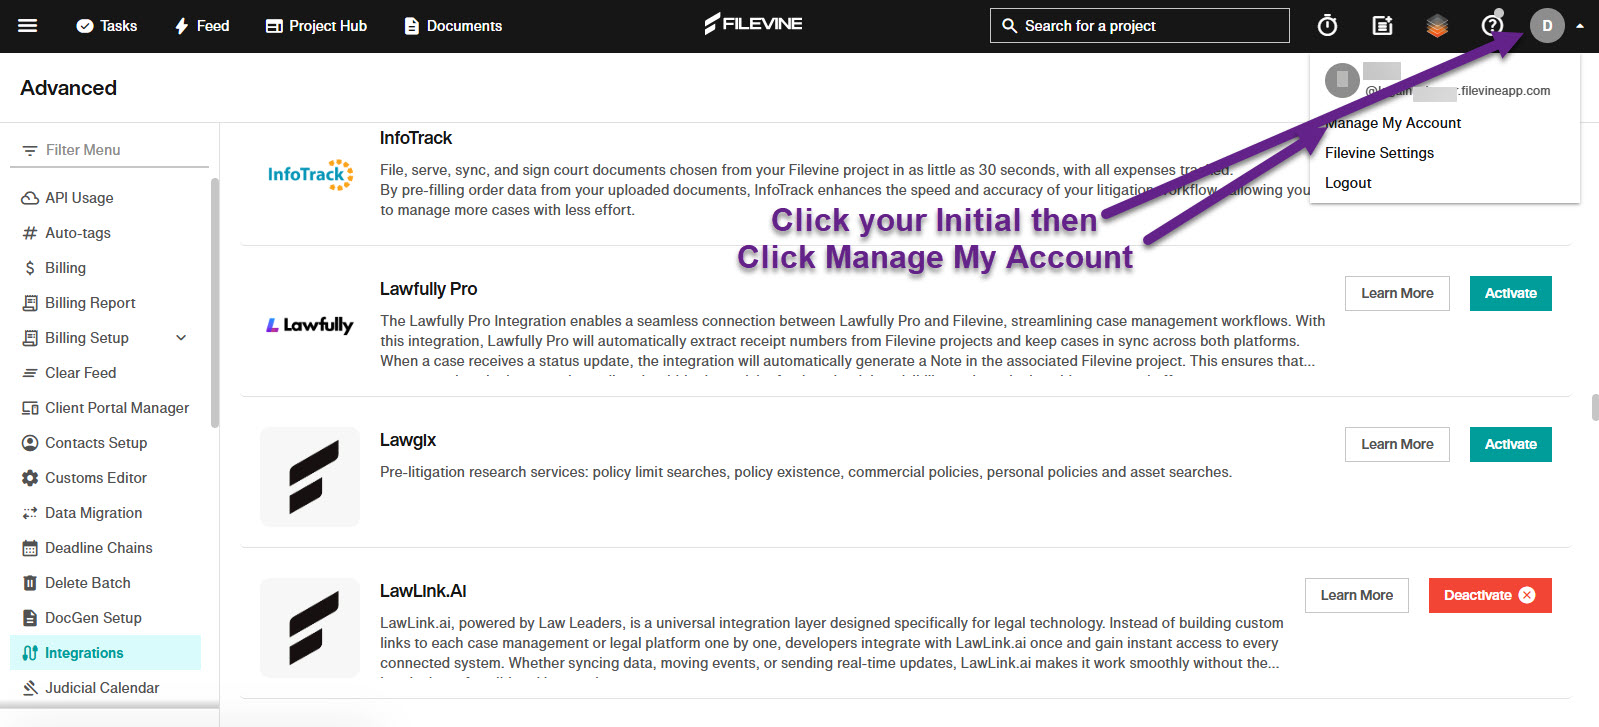
Click your initials icon in the upper-right corner of the Filevine dashboard and select Manage My Account.
Create a New Access Token
In the right-hand pane, click + New and configure the token:
- Name — Give it a clear name such as
Lawlink Integration. - User — Select your user. If your user isn't listed, select
clientportal@filevine.com. - Scopes — Check both Filevine API Access and Webhook API Access.
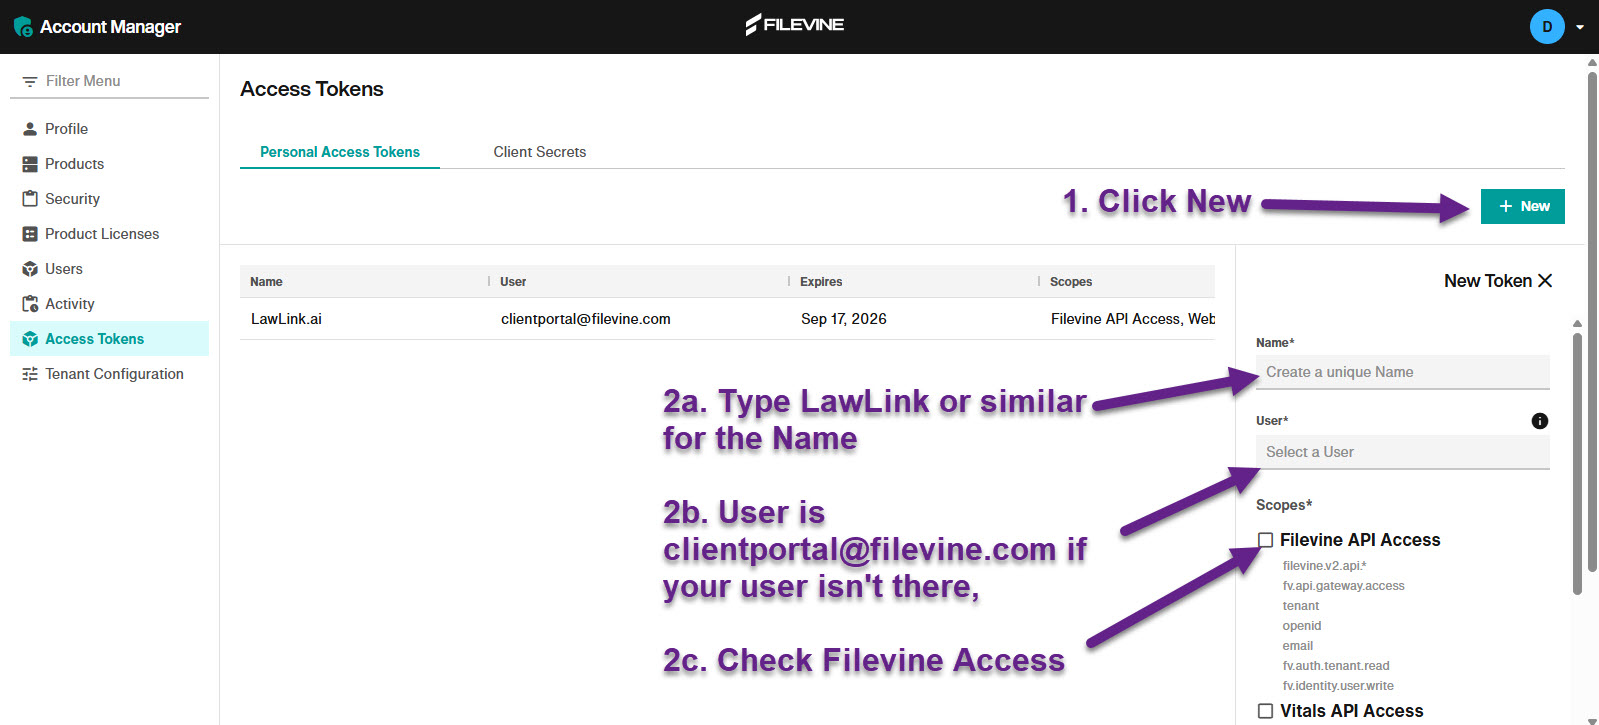
clientportal@filevine.com if your user isn't listed), and check
Filevine API Access.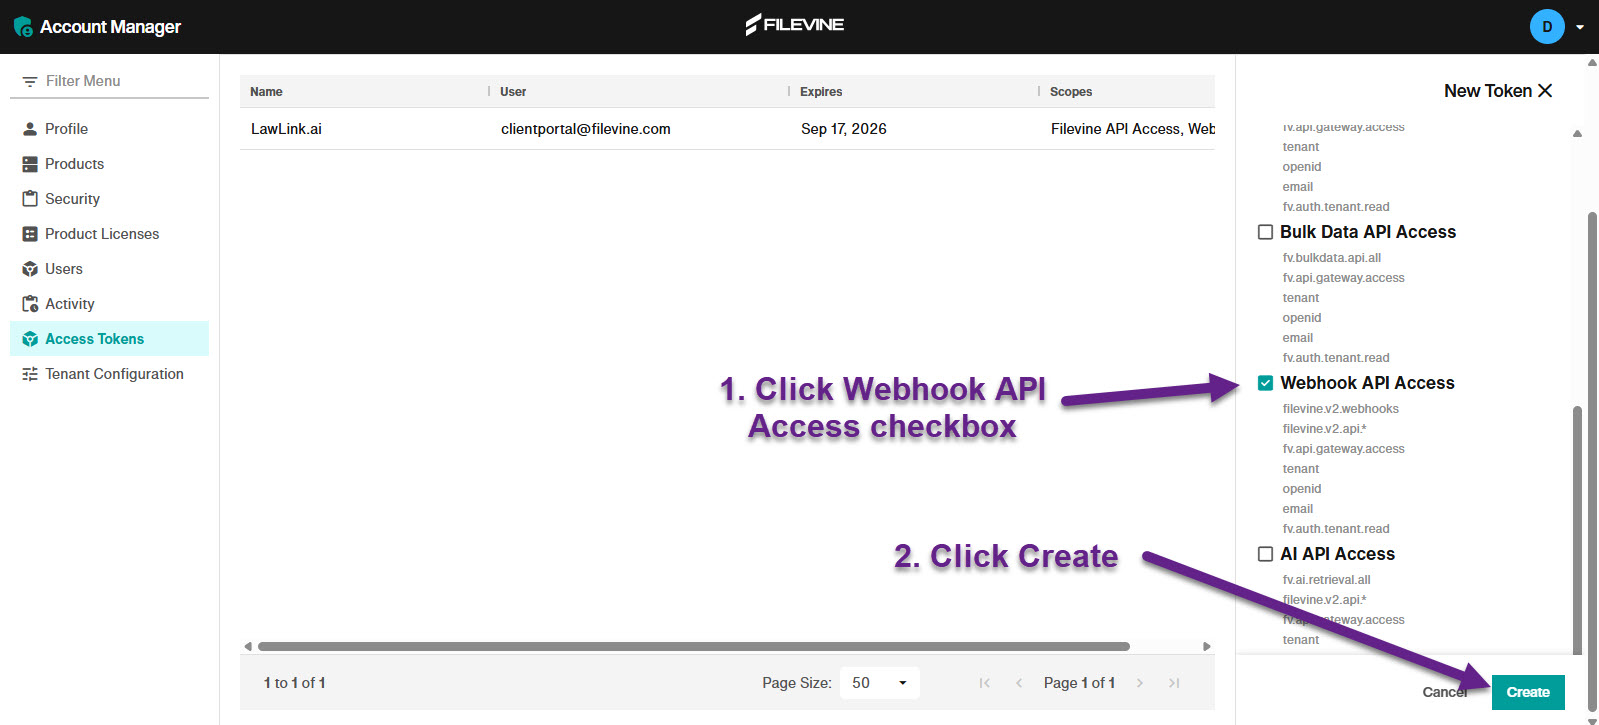
Reveal and Copy the Key
The key appears hidden in the window that opens — make it visible and copy it out. We suggest saving it in a text file on your computer for future reference, in case you need it again or need to share it with teammates.
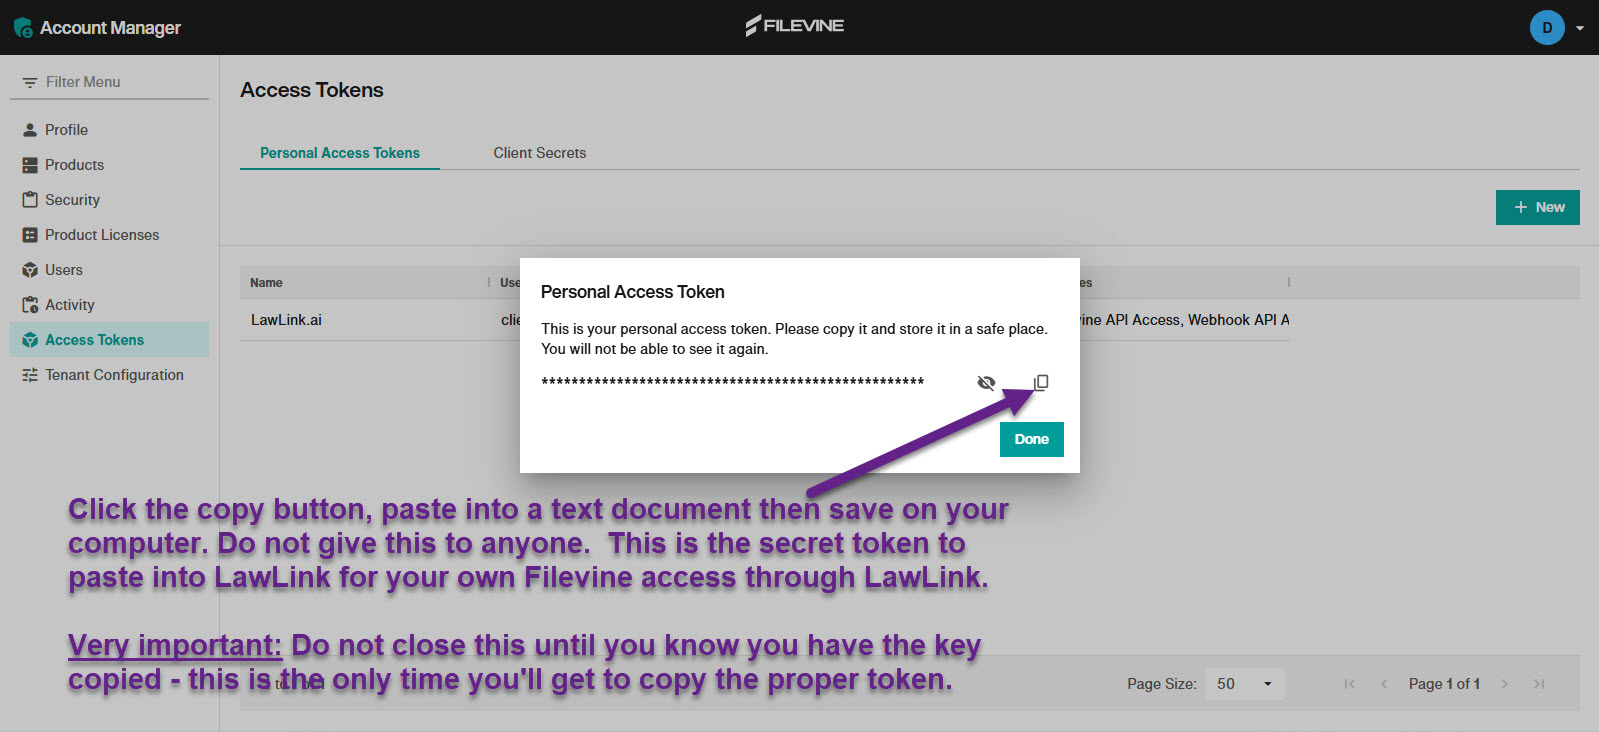
⚠️ Important: You will not get access to this key again. Copy it from this creation window now — the masked value shown in the Access Tokens list afterward is different and will not work for the integration.
👥 Separate credentials: If different team members need their own credentials — for example where a conflict of interest could occur — each attorney or staff member must generate their own token by following this procedure. In that case, be sure to include the staff member's name in the token name as well.
Authentication
Connect Filevine in LawLink
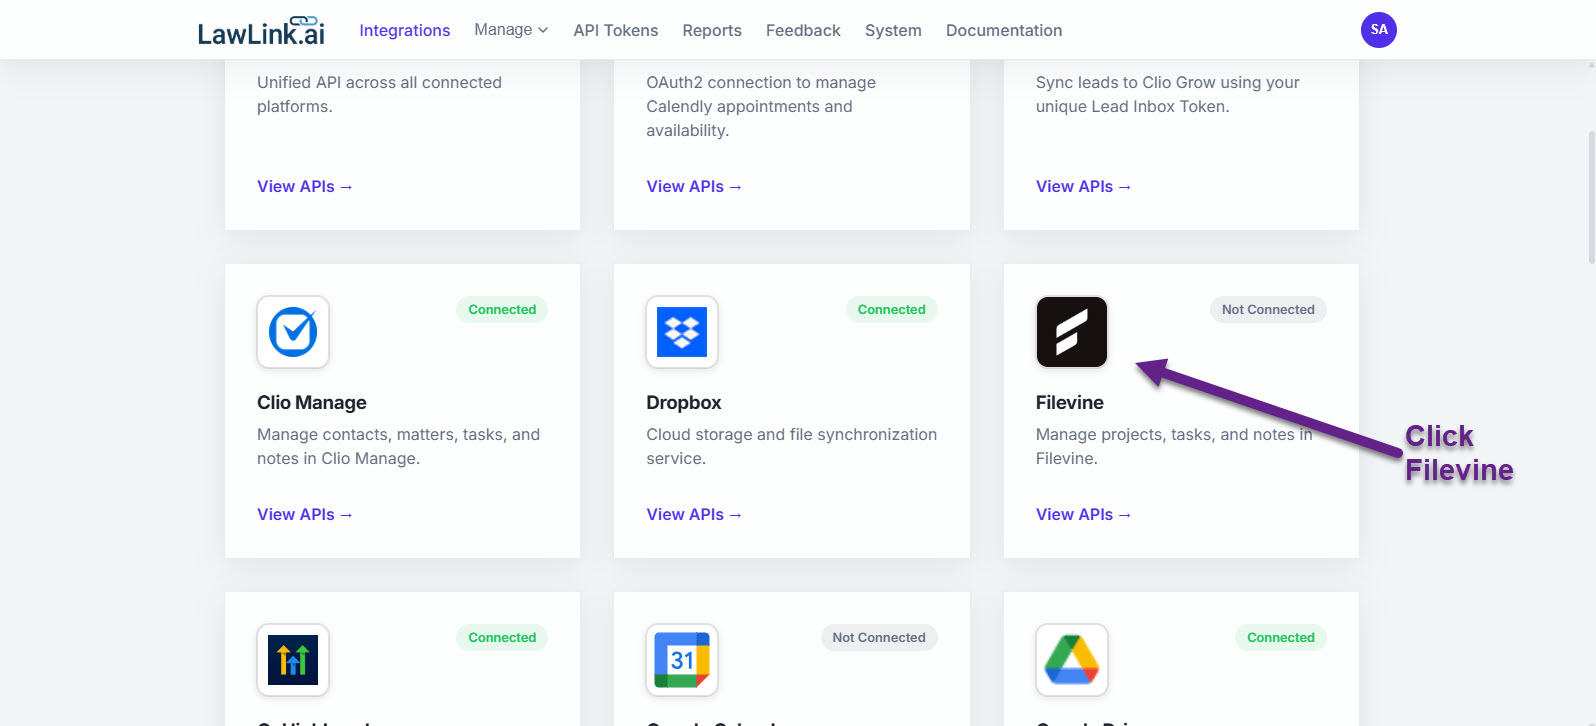
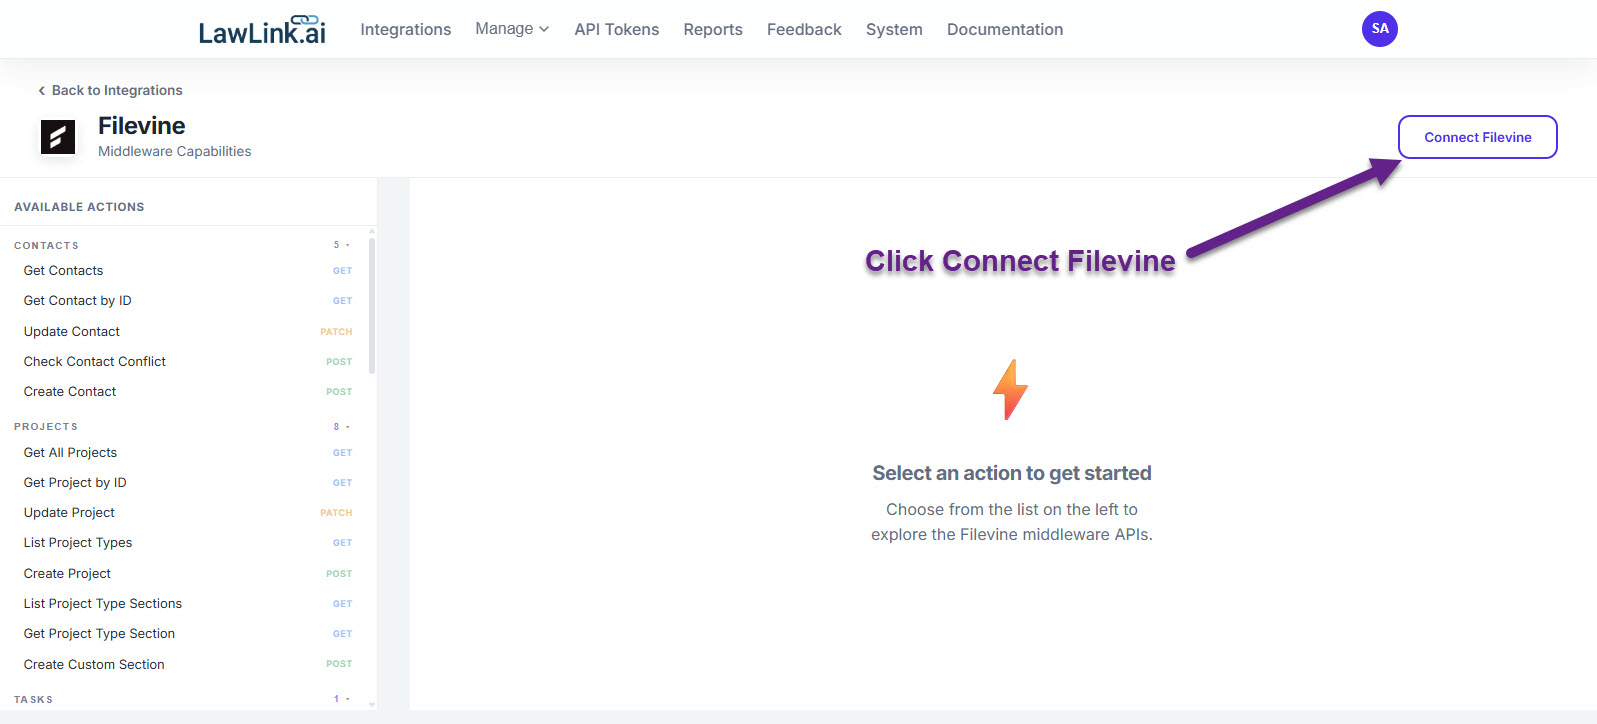
Go to https://app.lawlink.ai and log in. Click Integrations at the
top, select the Filevine card, and click Connect Filevine at the
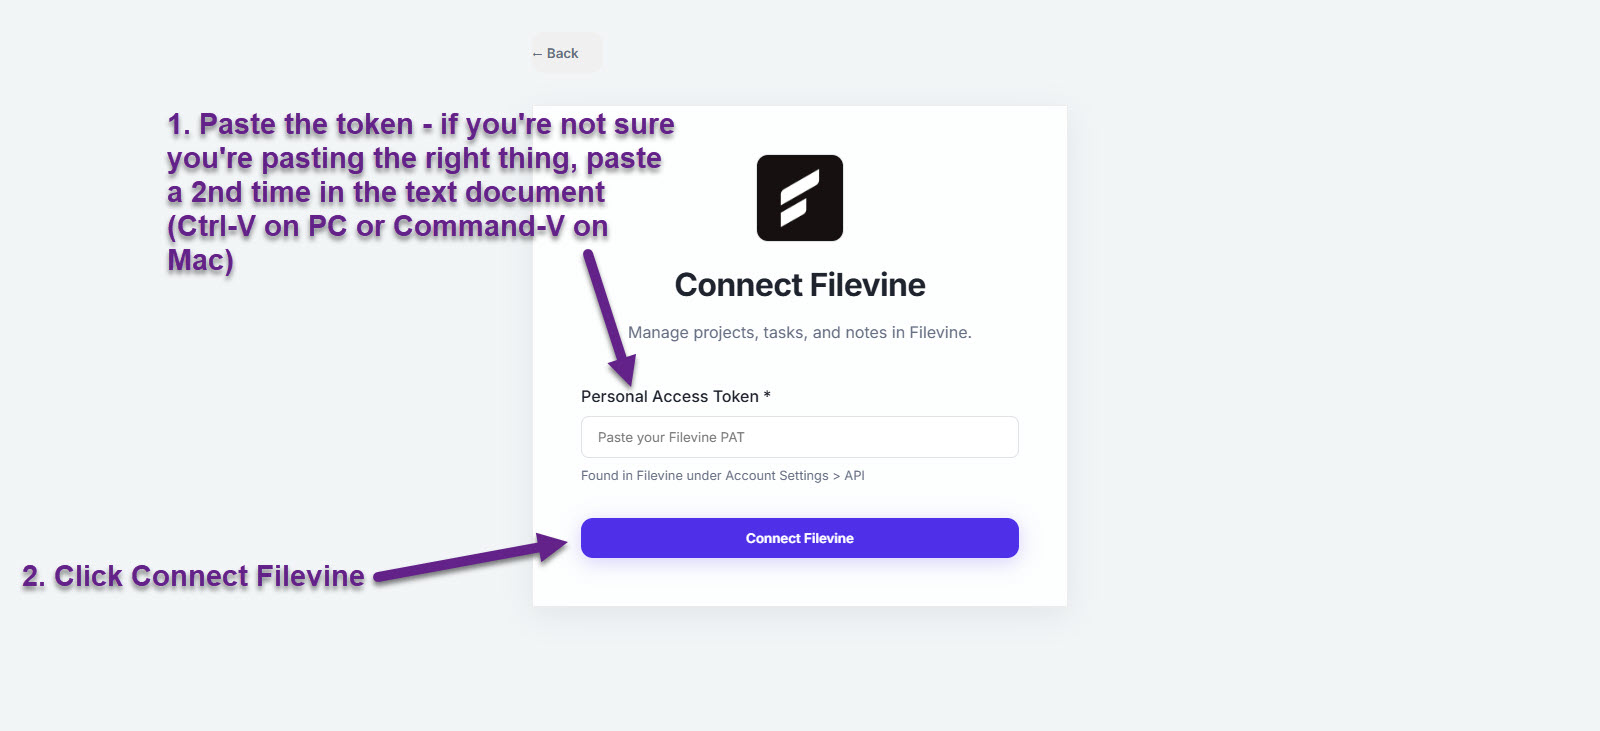
upper right. Paste the key you copied from Filevine, then click Connect Filevine.
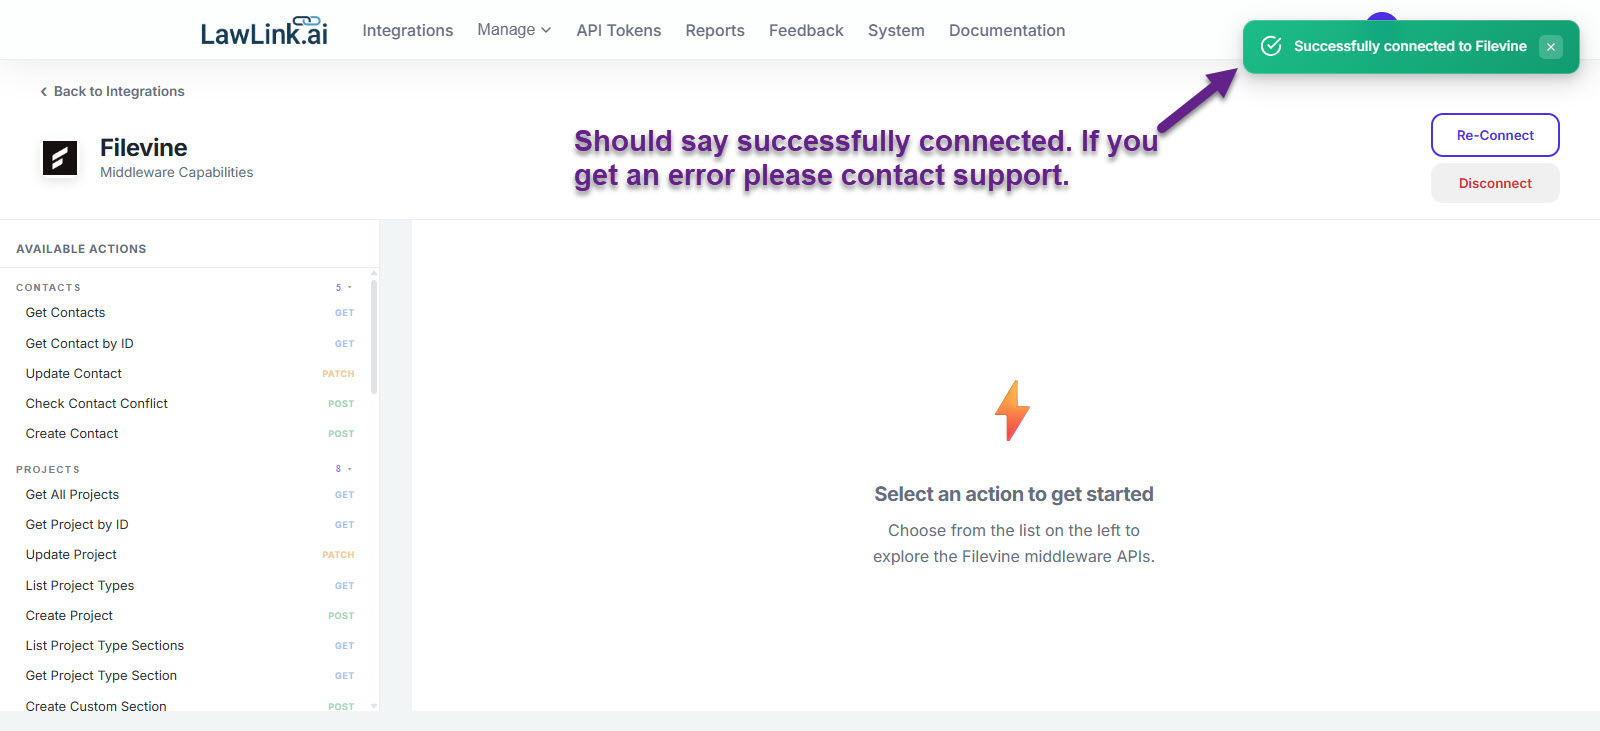
✅ Success: The connection indicator should now turn green. LawLink securely encrypts the credential and handles token exchanges automatically — you won't need to re-enter it unless you explicitly disconnect.
API Usage
Call APIs with Token & Headers
Use your LawLink API token in the Authorization header.
Filevine-specific session headers like x-fv-orgid and x-fv-userid
are handled automatically by the LawLink backend.
API Request Structure
Authorization: Bearer YOUR_ACCESS_TOKEN
Content-Type: application/json

# Optional Parameter (for ORG_ADMIN tokens)
attorney_email=attorney@lawfirm.com
Example: Get Projects
# List projects for the connected organization
curl -X GET \
  "https://app.lawlink.ai/api/v1/filevine/projects" \
  -H "Authorization: Bearer ACCESS_TOKEN" \
  -H "Content-Type: application/json"
Example: Create Task
# Create a new task in a project feed
curl -X POST \
  "https://app.lawlink.ai/api/v1/filevine/tasks" \
  -H "Authorization: Bearer ACCESS_TOKEN" \
  -H "Content-Type: application/json" \
  -d '{
    "ProjectId": { "Native": 266356 },
    "Subject": "Review Evidence",
    "Body": "Please review the new documents."
  }'
🔑 Key Points:
- The
attorney_emailparameter is optional and defaults to the token owner's account. - LawLink handles all v2 session token exchanges internally.
- The API token authenticates your application to LawLink.
Team Management
Manage Teams and Project Associations
LawLink now supports retrieving Filevine teams and associating them with specific projects.
Example: List Teams
# Retrieve all teams for the organization
curl -X GET \
  "https://app.lawlink.ai/api/v1/filevine/teams" \
  -H "Authorization: Bearer ACCESS_TOKEN"
Example: Add Team to Project
# Associate a team with a project
curl -X PUT \
  "https://app.lawlink.ai/api/v1/filevine/teams/1234/projects/5678" \
  -H "Authorization: Bearer ACCESS_TOKEN" \
  -H "Content-Type: application/json" \
  -d '{
    "applySubscriptions": false
  }'
Contact Conflict Check
Implement Contact Conflict Check
Before creating a new contact, use the /api/v1/filevine/contacts/check endpoint
to detect potential duplicates within Filevine.
🔍 Detection Logic:
- High Confidence Fail: Exact email match OR (Name + Phone match) OR (Name + Email match) OR (Email + Phone match)
- Low Confidence Fail: Phone-only match (same phone number, different name/email)
- Pass: No match found, or name-only match (safe to create — same name is common)
POST /api/v1/filevine/contacts/check
{
  "first_name": "John",
  "last_name": "Smith",
  "email": "john@example.com"
}
// Conflict Check Passes
{
  "status": "pass",
  "message": "No conflict found"
}
// High Confidence Conflict
{
  "status": "high_confidence_fail",
  "reason": "Email matches an existing contact",
  "contact": { "personId": { "native": 546255 }, "fullName": "John Doe", ... }
}